How to make an ax so that it can be given as a gift (21 photos)
So, first we need the ax itself. It's the most important. I bought a blade at a flea market from one grandfather (I don’t remember exactly, but I think the price was about 50 rubles). When I brought it to the workshop, I immediately placed it on a piece of paper and outlined it with a marker. On the leaf itself I was already trying on the shapes and thinking about the curves. In the end, I agreed that it was better to make a blade with a notch.
The advantages of this solution are obvious: reduced weight and aesthetics of this choice.

IMPORTANT: before cutting off the cutting edge (if necessary), make sure that the ax is NOT made of component parts.
Sometimes the butt of an ax is made of softer steel, and the cutting edge is made of better steel. It is easy to verify that the ax is suitable for modification - if the spark on the entire blade is the same, then the ax consists entirely of homogeneous steel.


We mark our drawing from the leaf with a marker on the blade.


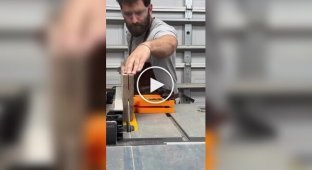
I made rough cuts with a grinder.
IMPORTANT: do not overheat the steel, water it with water all the time, and avoid discoloration. Alas, this is not always possible. After I have cut down the largest pieces with a grinder, a flap disk on an angle grinder and a semicircular file are used.


Now it’s time to remove the slopes and polish.
I made the bevels with a file, and then polished it with an angle grinder with a flap disk. Polishing is just as easy, by sanding the entire surface with a 40 grit flap disc, I took a drill and a velcro attachment. Then I started sanding, starting from 40 grit, ending with 1200 grit. Then finish with a felt circle and GOI-2 paste.


It shaves the hair, which means it is sharpened well.))


Next in line: wedging and making an ax handle.
I won’t tell you much about the ax handle, I’ll just say that it’s easier to buy a ready-made blank and hand it over to you. It's already dried the right way and fits perfectly. I wedged it with three wedges using PVA glue. (this is quite enough, but lovers of epoxy resin and gauze are in the woods).


Then I also sanded the strips from the hacksaw.

All that remains is to cover it with stain.


Here is the finish, to complete it I wrapped the ax handle with jute cord and soaked it twice with PVA. It turned out to be reliable and convenient. (although the winding here is more for aesthetics)


Author: Yaropolk