Do-it-yourself admin tambourine!!!
And so, according to the prevailing stereotype, a tambourine is an integral attribute of a real admin. Some people buy it themselves and give it to someone as a gift, but then you will learn how to make a real system administrator’s tambourine from scrap materials with your own hands!
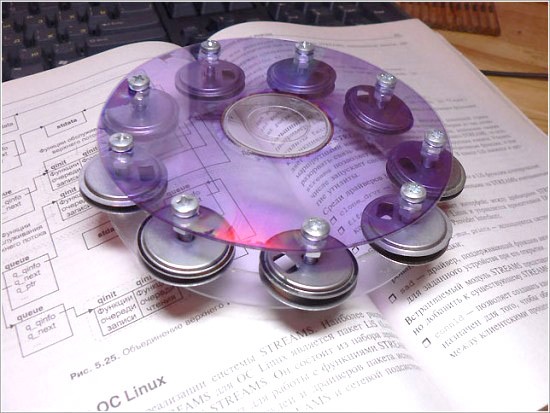
This is what it will look like

Instructions for making a tambourine.
0 Prepare everything you need
0.1 Print a file with markup - know-how :) (download MARKUP)
0.2 Take unnecessary CD and DVD discs (one piece at a time)
0.3 Buy screws: 9 screws with a 4 mm thread and a length of 30 mm, 9 cap nuts (for a 4 mm thread), 45 nuts for 4 mm (there is an alternative to screws - rods from handles - but they, IMHO, are worse)
0.4 Break 18 floppy disks and remove the rings from them

0.5 Tools: strong and long scissors, stationery. knife, drill, screwdriver, wrench, marker
1. In a sheet of paper with markings, cut out the inner circle (you can also cut out the outer circle - as it will be convenient)
2. Align the disk (regular CD) with the large circle on the marking and draw a ring along the inner circle - so that the rim is drawn on the disk.
3. Cut out the rim. How it's done:
3.1 You need long, strong scissors - centimeter-long radial cuts are made from the central hole to the plastic relief ring on the disk - then the resulting sectors are broken out.
3.2 Using scissors, cut strips of plastic from the disk in a spiral with small steps. In this case, you need to make sure that the ring does not bend too much - they often break, but I think blanks with a rub will work - about 5 turns are cut out to reach the marked ring
3.3 Using a utility knife, cut off the irregularities inside the rim ring
3.4 If the blank was clean (not a purchased disk on which the picture was printed), then using the same knife, carefully remove the shiny layer - it must be picked up and removed (the shiny layer is where the cover is). If something was printed on this cover (the disc was originally purchased with the recording), then the shiny layer does not collect dust and is not removed.
Attention!!! This shiny layer (in clean blanks) likes to turn into sparkles during any operation, which will then be everywhere! They are very difficult to wash off or wash off later - so I recommend doing this over a newspaper and taking care of your clothes.
4. Making a membrane: you need to take a DVD blank - if you look at it from the end, you can see that it is two-layer - the same stationery. You need to split it with a knife - drive the knife between the layers. I recommend TDK or Verbatim. In this case, another catch arises - between the layers there is an indelible shiny layer and on which half of the disk it decides to stay is a mystery of nature, so if when the knife has entered between the disks and you look at it from the lilac side ("mirror") and you see the blade from this place, insert the knife further and, as it were, cut the layer between the disks - along the circumference, if the knife is hidden under the shiny layer - try to split it on the other side.
The result should be a transparent and thin lilac disk - this is know-how :)
5. Next, the points are transferred from the markings to the ring - and holes are drilled there, then they are transferred from the ring to the membrane and also drilled (on the membrane it is better to mark the holes according to those already prepared on the rim - this way there is less error)
It is better to drill with a drill or screwdriver - a 4mm drill or better for metal. If you don’t have a drill, you can dig it out with a knife - just do it carefully - the quality will definitely be worse, but you can live. After drilling, you need to remove burrs from the holes.
Attention!!! You should absolutely not try to make holes with concrete drills, hammer drills, jackhammers, or regular hammers - the disc will instantly fly apart :)
6 We assemble a boubouen from parts:
6.1 Insert the screws into the membrane and screw on 2 nuts - just tighten without tightening
6.2 We put the floppy disk ring on the screws
6.3 Screw on the nut (know-how :)) - this is used so that the rings do not “stick together” and sound better
6.4 We put on another ring, tighten 3 nuts each
6.5 Putting on the rim
6.6 Screw on the caps
6.7 Level and tighten - tighten all the nuts near the membrane, then screw on the caps so that the rim is level - tighten the nuts under the rim. The middle nut should simply be loosened - during operation it will still occupy an arbitrary position between the diskette rings.
Attention!!! Do not tighten the nuts all the way! If you overtighten, the boards will split - it will be immediately unsightly and will soon break - i.e. As soon as the nut stops being screwed in with normal pressure, you should leave it that way. The second nut - which is on top of the nut, and not on top of the plastic - must be tightened as much as possible - this is a locking nut - it is needed so that the screws do not come loose later.
That's all.
Where problems arise:
1. Making the rim - the disc breaks if it is bent too much - because cutting from the center of the bend cannot be avoided, but you have to be careful.
2. Splitting of the disc - a shiny layer between the discs can remain on either half - you need to keep an eye on this.
3. Tightening the nuts - do not overtighten, otherwise it will crack.
In principle, after the 3rd time, every problem is solved - if you do not leave it as is, but correct it, the result can be very good. If you don’t break the technology, it turns out to be quite a durable thing.